Chapter 9: Sanctuary
Finally, the Hero of Legend reaches Lemelin Monastery and meets Grandmaster Oxley. But they do not have much time to rest at all, for the Veridian armies of Prime Minister Casamir are ready and are about to launch their attack on the Monastery.
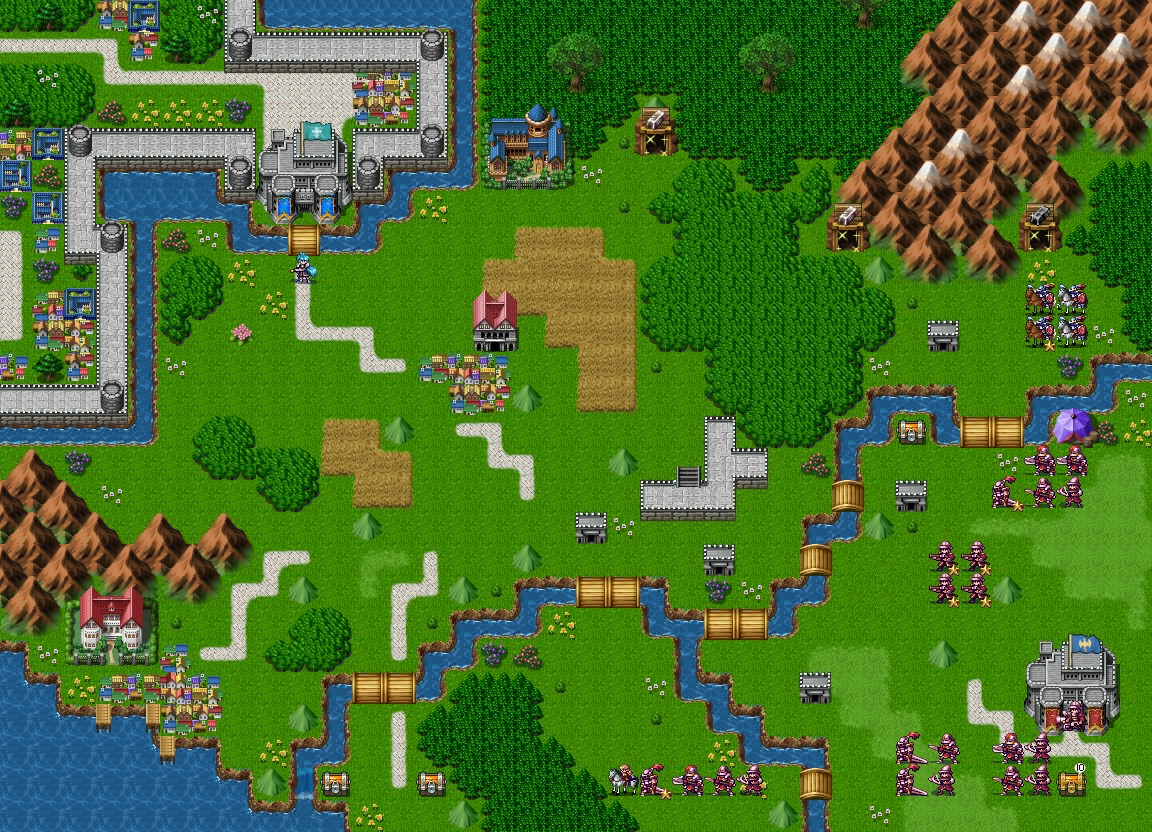
Map
Objectives
| Mission Info | |
|---|---|
| Main Objective |
Defend Lemelin Monastery for 15 turns OR Seize Westerfield Fortress |
| Defeat |
Hero of Legend is defeated in battle OR The enemy captures Lemelin Monastery |
| Challenge Missions |
1) Lysander is not defeated in battle (20 |
| Target Turns | 12 |
Points of Interest
Allied Structures:
- (9,6) Lemelin Monastery (Home Base)
- (16,5) Donari Temple
Capturable Objectives:
- (33,22) Westerfield Fortress, capture for 150

- (15,10) Auberland, capture for 267
 and 3
and 3
- (3,20) Port Herald, capture for 3588
 and 17
- (20,4) Iron Mine
- (26,7) Iron Mine
- (32,7) Obsidian Mine
Bazaar:
- (33,13) Bazaar
Treasures:
- (10,24) Fire Affinity Scroll
- (13,24) Trait: Bodyguard
- (28,13) Proof of Merit
- (33,24) Trait: Bloodlust. Timed Chest: 10 turns.
Strategy
Though the winning of the chapter, by capturing the Westerfield Fortress seems like a daunting task, due to being outgunned and outnumbered, but it is much easer than it seems, as you may easily outwit them. They will not advance at once, which would otherwise make this chapter a true challenge. Like the Hero of Legend suggests, taking the wall section near the river, with some archer squads, can make this place strategically advantageous while holding of the advancing enemy. This can be done around turn 3. The best tank squads, should be placed on the front line.
One the north, try to lure the four cavalry squads inside the woods, with light infantry squads to deal with them. The squad of Raskuja is quite up to this task. Try not to let more than two squads attack a single squad. One or two squads will engage in combat, while the rest of them may head south. This will delay them though and with archers on the wall, there some opportunities to harass them. If the squads are performing well, you may use them later to potentially lure other troops inside the woods as well.
In the center part, are the Gunner squads, though they are quite capable of killing, they are vulnerable to any type of damage themselves. As such, you can lure them with a good tank-squad and they will likely destroy them. This is the first task in order to capture the walls. Try to lure two squads on the second turn with two tanks. Its certainly possible to position two squads in that manner.
When it comes to capturing Port Herald and the two chests south of the map, assign a squad of light infantry/cavalry or a weak squad to that task. A heavy cavalry squad get more slowed down by the villages and woods in between those objectives, even though there quite some squares to travel. One or two cavalry squads should be used in the central part of the map.
When the six cavalry of Isanter appear near the two treasure chest at coordinates 10,24 13,24, the general Lysander will switch sides. Though his squad is capable of some destruction, is not the most sturdy squad.

